Tuesday, September 27, 2011

11 Rules Kids Won't Learn in School


Over the past few months, our campus has been buzzing about the "ME" Generation. I did a little bit of research on my own.  One anecdote that I found in my research has been haunting me - it was about a nurse who recently graduated from college.  She had administered the wrong meds to a critically ill patient, and luckily, her supervisor noticed.  The head nurse took her aside and scolded her, citing the very real possibility of killing the patient. The graduate's response was to correct the supervisor - she said: you should have commended me positively before saying anything negative about my performance.

I immediately needed someone to help me pull my jaw off the floor.  I thought: Is she SERIOUS? How could this young nurse take this giant mistake as lightly as making a wrong turn on the highway?  Is this the general consensus of college students?  Do they all need a massive wake-up call?

Then someone posted on facebook 11 Rules Kids Won't Learn in School. As I researched the origin of the list, I found that it was from a book by Charles J. Sykes, author of the 2007 book, 50 Rules Kids Won't Learn in School: Real-World Antidotes to Feel-Good Education.  As I read through the table of contents, the mentality of the "Me" Generation became clear.  I've fashioned the most quoted 11 Rules into a poster, a reminder to parents and students alike, that the real world isn't going to commend your performance if you accidentally kill a patient.


Friday, June 10, 2011

How-To Friday: How to spray paint (the correct way)

I've spent most of my adult life up-cycling old things by spray painting them, and I've discovered that not everyone is like me. Whether you've just gotten interested in being crafty, or get frustrated at how easily spray painting something can go wrong, this DIY How-to Friday is for you!

Let's start with what you'll need:

1. Something you want to spray paint. 2. Something you can only PARTIALLY paint (i.e. mirror, picture frame, etc.) 3. Masking or Painter's Tape 4. Trusty X-acto knife (everyone should have at least one, plus spare blades) 5. Ice cold drink (especially if it's a hot day) 6. Primer - this step shouldn't be skipped (any brand.) 7. Your desired spray paint. I like Valspar Brand (Lowe's) because they offer a wide variety of colors to choose from, and it covers really well. Krylon Indoor/Outdoor is a close second.

Some items, you'll need to sand. Primer should take care of the stick-ability of the paint, so if you're unsure whether or not to sand, use primer, maybe two coats.
I sanded the K with some rough-grit (3M 60 grit.) The lower the number, the rougher the paper. If you're painting raw, untreated wood, sand it twice. Once with rough-grit, and once with a finer grit.

Other items, like antiques, picture frames/mirrors and things with a lot of detail, you won't want to sand.
I'm going to mention the Primer again. First off, and above all, primer will conceal the color of the item, and when you paint, it will be closer to the desired color, without a tint of the original color. I'll show you an example of with/without primer below.

Any item that needs masking off, like this mirror, should be done CAREFULLY with masking or painter's tape. First, clean the mirror's surface with a damp rag and let dry completely.

Next, start in the middle and work your way outside. Circles and ovals are the most difficult to do because of their curves, but painter's tape is pliable enough to take the shape of the curves.

Using your fingernail, push the tape as far into the corner as you can, all the way around
Using your X-Acto blade, cut off the excess as close to the frame as you can, not the mirror. Notice how angled my blade is.

Take off the excess cut tape, and you should have a little bit of tape that's not pushed down, if there's any gap between the frame and the mirror. Leave it that way.

Once you have the mirror completely masked off, and the excess tape removed, you're ready to prime!

Next- you'll need a surface that you can paint on. I keep cardboard boxes around just for this very task. That way, the object is slightly raised, but on a flat sturdy(ish) surface.

I did this experiment just for you. In the above photo, I skipped the priming process, and painted the one frame.

The other frame and the K are about to be primed. I determine several factors as to where and when I'm spray painting: sun, temperature, wind. If it's a hot, muggy day, it's not a good idea to paint. Same goes for gusty wind. If the sun is directly shining on your object, the aerosol paint can actually dry before it even lands, which creates a bumpy and un-even texture.


I chose an overcast day. Always paint in a Z-formation. Start painting just outside the edge of the object, and go all the way across horizontally and then back again. Keep the Z formation going, spraying about 10-12 inches away from the object. Keep a steady stream, and move a little slower than you think you should, but not slow enough for it to pool or drip.


Leave your primer pieces to dry for at least 30 minutes. The can may say 10 minutes, but that doesn't take into consideration humidity.
After 30 min, do a fingerprint test. Find an inconspicuous place on the object and lightly touch it with your finger and pull away gently. If you feel ANY tackiness or if you can SEE your fingerprint, let it dry 10 more minutes before you paint over the primer. Better to wait.

Now that I've painted - can you tell which one was primed? I'll show you below. :)
Leave your painted object to dry for ONE HOUR before handling. I'm not kidding. Ignore what it says, you'll be very upset if you've gone through all of this only to scratch or smudge the paint.

When it's ready, use your X-Acto blade to cut across the center of the tape.

Use the tip of the blade to lift the tape and gently remove it.

YAY! all done. I usually let my spray painted objects air out for about a day or so to let that stinky smell go away before I bring it into the house.

Can you tell yet which one was primed??

The finished K - ready to hang!
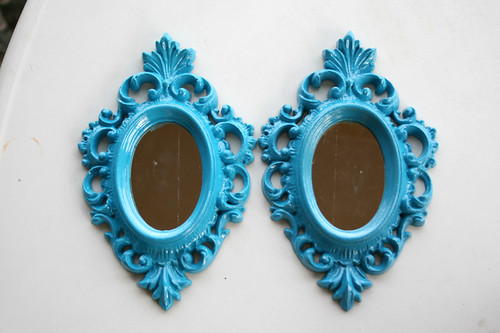
framesThe one on the left got a primer coat before painting. Can you see the difference? it's not HUGE, but the color and vivid-ness of the blue seems more accurate after being primed. It's brighter, and prettier.

IMG_2593

Finished product shot! woo!

Monday, June 6, 2011

Project: Overhaul {Guest Bedroom/Art Studio}

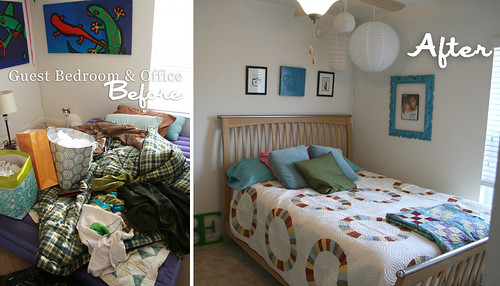
When we moved in to our house in September of 2009, I had the best intentions of keeping this room organized and usable as an Office/Art Studio, designing ideas for an office with the desk in the closet. I was inspired! And then life happened.

This room didn't get used, except for when my step-daughter Megan used it as her bedroom, or when guests stayed over. The Queen sized inflatable mattress served it's purpose for a time, but for over a year, I've been scheming and dreaming of creating an actual Guest Bedroom that serves as an Art Studio with a workspace that's accessible.

At first, this was a great idea. But we got a new computer, and set up a desk in the living room.

After the wedding, I used this room as storage, and just to get things out of sight.

I hung all of my reptile paintings from college in this room, with no rhyme or reason.

The only thing that was used on a regular basis was the bookshelf and filing cabinet.

- A F T E R -
We purchased a new bed for the Master Bedroom (it was over 10 years old!) So our bed got moved to the guest room.


I moved the makeshift desk from the closet to the room, to make it accessible to use. (I purchased a piece of wood at Lowe's, sanded and coated 3-4 coats of polyurethane for the desk top, and used shelves I already had for the base.) I moved the filing cabinet into the corner.

Using frames and postcards I already had - I hung some new art. My mom gave me the clock, and I up-cycled it from antiqued silver to Turquoise to go with some of the decor I had in the room.

A lot of the decor I had for our wedding, the birds and owls and cages decorate the top of the filing cabinet (which I painted over a year ago) I gathered up some art tools and put them all in one location here on the desk.

Frames and postcards, again, and the wood carved crown in the middle was in the room before (look above the filing cabinet in Before Pictures) but I painted.

More spray paint work (see next blog post for "How to Spray Paint the EASY Way") - Mirrors all rescued from my mom's collection of Yard sale junk.

Side by side, here are the before + after photos:
(Click to Enlarge)

before and after Art Studio Guest Bedroom

before and after Art Studio Guest Bedroom

before and after Art Studio Guest Bedroom

Thursday, June 2, 2011

Ham and Swiss Croissants (so easy)

I was looking through a photography blog and came across some photos of a baker at work, and was inspired to try this for dinner - so simple, and so yummy.


Ingredients:
- Ham Lunchmeat
- Swiss Cheese Block
- Croissant Ready-to-Bake Dough

Heat oven to 350.

Directions:
1. Slice the cheese as thin as you can, it doesn't have to be perfect or uniform.


2. Cut the ham into smaller strips - triangular, if possible.


3. Roll out the Croissant Dough Triangles, and arrange the meat and cheese over it.


4. Roll up each croissant and place on an ungreased baking sheet.


5. Sprinkle a pinch of salt all over the rolled up croissants.


6. Bake for 12 minutes uncovered, and cover with foil. Bake for additional 5-8 minutes (a little longer than the package suggests).


Enjoy!

Monday, April 11, 2011

Quick and Dirty Cinnamon Bun Minis

(Aside: I use the term "quick and dirty" in the classroom a lot. I'm usually referring to doing something in a hurry, and not neccesarily the correct or acceptable way. I do a lot of things quick and dirty.)

Sometimes you just really need a gooey sweet treat. I wanted some monkey bread, but didn't have all the supplies to make it, so I modified it. There are a few things I would do a little differently... Maybe a different baking dish/pan. Anyway, Here's what I did.


Ingredients:
- 1 can of poppable biscuits
- 1/3 cup of brown sugar
- 1/4 cup of white sugar
- 1/2 stick of butter
- 1 tablespoon cinnamon
- Pam

Directions:
Heat oven to 350, as directed by can of biscuits. Spray pam (I like butter flavor) all over the lining of the pan, dust with a little bit of white sugar. Mix the white sugar and cinnamon in a plastic zip bag.

Open can of biscuits and using your hand, press out long and flat, into as much of a rectangle as you can get.
Once you mush the biscuits flat, put them in the zip bag and cover with cinnamon sugar mix.
(This is Jason's work of art. He added coconut and an chocolate almond to his. He doesn't like to follow instructions.)

Take it out, roll it up and cut it into 1/2 with a sharp knife, and place in the pan.
My suggestion - leave a bit of distance between them. The 2 on the left were cut in 1/2, and the rest were cut into thirds. Repeat until your pan is full, or you run out of biscuits. Let them rise a little while - 10 min will do.


In a saucepan over low to medium heat, melt butter and brown sugar until it starts to bubble.
Pour hot mixture all over biscuits, which we will now call cinnamon buns.They already look yummy, but wait till you bake and taste! Bake about 13-15 min.

-Something to think about: I might try dunking the minis in the butter/brn sugar mixture, so the tops all get evenly coated, OR brush it on. either way, you can't mess up the yumminess!