Saturday, July 31, 2010

I'm basically making a bomb in my kitchen, it's just made of meat.

Photobucket


I'll admit: I was more than reluctant. I was afraid.

I'm not afraid of much when it comes to the kitchen, but there are a few things I've never done out of fear. Using a pressure cooker was one of those things.

My friend Brooke and I were going through dinner options when I said "I have a roast, but it's frozen." The conversation stopped for a moment. A 3 lb. roast is nothing to scoff at. I took it out of the freezer and we just looked at it, hoping somewhere on it there was an easy button.

How long was it going to take? Let's calculate.... if we defrost in the microwave we can shave off some time... We'll still be here til 11pm before we even get to taste it... and it could be dry...

And then it hit me. "I have a pressure cooker..."

Photobucket


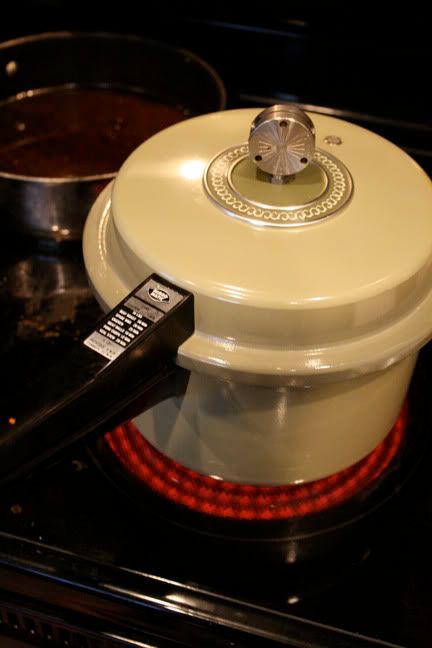
I knew EXACTLY where my pressure cooker was, but I'd never used it. So, as with all things I've never done before, I turned to the internet. It offered little insight into the particular 1953 model that I was wielding. On the handle was printed pressure, and different dishes with their respective cook times. No other information.

So I just went for it. I was excited as much as I was nervous about using it. The roast was already defrosting. I started chopping the onions, carrots and potatoes, thinking: at least we'll have SOMETHING to eat if this goes badly. I'm basically making a bomb in my kitchen, it's just made of meat.

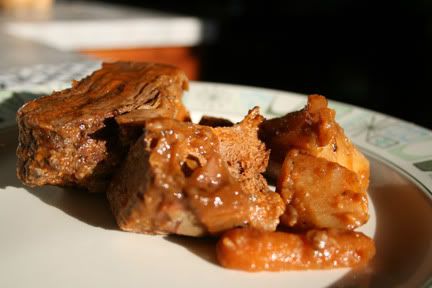
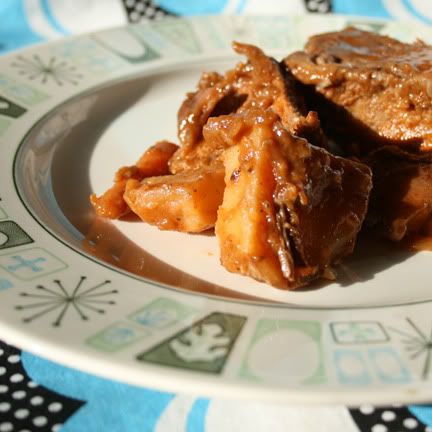
Approximately one hour later, we were successfully eating one of the best beef pot roasts I've ever had (or made).

Photobucket


One Hour Pot Roast

- 3-4 lb Beef Roast at Room temperature
- 2-3 medium potatoes, chopped into large chunks
- 1 medium onion, chopped into large chunks
- 1-2 handfuls of mini carrots, chopped as you like
- 1/2 jar of marinara sauce, or any tomato sauce
- 1 can or dry packet mushroom gravy
- 1 packet McCormick Pot Roast in a bag (ditch the bag)
- 3 cloves of garlic
- Fistful of Flour
- Salt and Pepper

Directions:

Heat a deep skillet with about 2 tablespoons of olive oil over medium high heat.
Salt, Pepper, and lightly flour the roast on all sides.
Sear the roast all over til it's crispy and brown.
Place the Roast in the Pressure Cooker, fat side up.
Sprinkle about 1/2 of the Pot Roast Seasoning over the meat, followed by a cup of water, and 1/2 jar of marinara sauce. Crush or chop half the garlic, and add to the liquid.
Secure the lid tightly, and depending on your pressure cooker, set it to 10lbs of pressure. Put it on medium heat on the stove, and set your kitchen timer to 50 minutes.

In the same skillet, add 2 cups of water, the remaining pot roast seasoning and 1/2 the mushroom gravy over medium heat, until it bubbles.
Add Chopped potatoes first, then carrots, then onion, then crushed or chopped garlic with 4-5 min between each.
Allow it to boil, and turn the heat to medium low and cover.

Photobucket


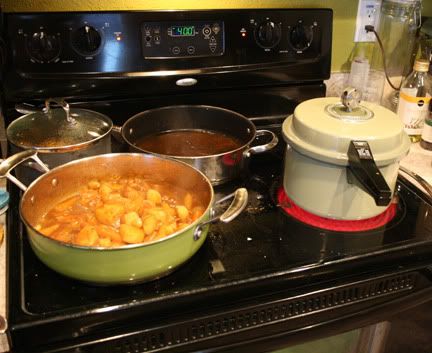
All of this can sit unattended for a little while, stir the skillet once in a while.
Your pressure cooker is going to make some noise, don't be too alarmed, it's releasing some of the steam.

Once the timer has gone off, carefully release the steam valve, but don't open the pot until it stops shooting steam.

Feeds 4-5

Tuesday, June 22, 2010

Florida Style Shepherd's Pie

Ingredients:
- 1/2 lb. ground beef
- 1/2 lb. ground pork
- 1 can french cut green beans
- 1 small can carrots
- 1 small can corn
- 1 small can sweet peas
- 2 cans Campbell's golden mushroom soup
- Instant mashed potatoes (8 servings, prepared)
- 1/4 cup Bisquick
- Garlic powder, Salt and pepper to taste
- 2 cups shredded cheddar cheese

Kitchen:
- Large Skillet
- Large Saucepan
- Large Casserole

Directions:
Heat oven to 400.

In saucepan over medium heat, empty cans of soup and 2 cans of water, add all of the veggies, garlic, salt and pepper. Let simmer.

Over medium high heat, brown the ground beef and pork in the skillet. Drain well.

Once the veggies and soup have been boiling for at least 6 minutes, add the Bisquick, one tablespoon at a time. It will start to thicken. Add the meat mixture and transfer to the casserole dish. Top the mixture with mashed potatoes, making sure to spread out all across the top, sealing off the dish. Sprinkle cheese evenly over the potatoes.

Bake for 20 min.

Peach Cobbler

Ingredients:
- 1 stick butter
- 1 c. flour
- 1 c. sugar
- 1 3/4 tsp. baking powder
- 3/4 c. milk
- 1 lg. can sliced peaches, drained

Kitchen:
- Glass casserole
- Large mixing bowl

Directions:
Heat oven to 350.

Melt butter in glass loaf pan in the oven. Mix together in mixing bowl flour, sugar, baking powder, and milk. When smooth, add drained peaches. Pour on top of melted butter in loaf pan.

Bake for 40-50 minutes. Top should be golden brown when finished.

Grilled BBQ Boneless Ribs

The key to these ribs is the rub/sauce combo. Rub goes on first, Sauce goes on 4-5 minutes before removing from the grill.

Kerri's Meat Train Rub
Get an empty shaker and keep what's left for next time!
Ingredients:
5 tablespoons of
- Paprika
- Brown Sugar
- Red pepper flakes
- Black peppercorns

3 tablespoons of
- Salt
- Cayenne Pepper
- Italian seasoning
- Garlic Powder
- Onion Powder

Kitchen:
Food processor
Large kitchen knife

Directions:
Using the side of the large kitchen knife, blade facing away from you, press down to crack peppercorns coarsely.
All ingredients go in, process until completely combined.
Pour into shaker.


Ribs
Ingredients:
- 1 lb boneless country style pork ribs
- Kerri's Meat train rub
- BBQ sauce, Your favorite mopping sauce

Kitchen:
- 1 Large plate
- Grill tongs
- Grill mop or brush
- Leave the kitchen, go directly to the grill.

Directions:
Sprinkle the rub generously over all sides of ribs, and rub in. Allow to sit for at least 20 min.

Light the charcoal and let burn down to embers.

Put the ribs on the middle of the grill. Put the lid on and let it cook for 4 minutes. Turn each rib 1/4 turn. Lid and cook another 4 minutes. Repeat. Once all sides are browned, mop sauce all over the ribs and return to the heat for 2 minutes. Turn 1/2 turn for another 2 minutes.

Mop a little more as you return the ribs to the plate, and serve!

Orange Fried Chicken

Ingredients:
- 1 cup of orange juice (with pulp is best)
- 1 lb of chicken, cut into pieces, or 2 cornish game hens
- 1 cup flour for dredging
- 2 eggs, beaten
- 1 tbsp cayenne pepper
- 3 pinches of Salt and pepper
- 3 Heaping Tbsp Shortening, butter flavor

Kitchen:
- Large Cast Iron Skillet
- Tongs or Long Handled fork
- Large working surface
- 3 shallow bowls for dredging
- Large plastic zipper bag
- Baking racks
- Paper towels

Directions:
Mix orange juice and cayenne pepper in a large zipper bag and refrigerate for 30 minutes to overnight.

Heat shortening in skillet over medium to medium high heat. (about 365 degrees)

Put flour in a shallow bowl, add salt and pepper. Separate and put half in another bowl. Put beaten eggs in a separate shallow bowl. Set bowls up near skillet: Flour, egg, flour.
Remove chicken from marinade with tongs and dredge in flour mixture completely covering the chicken, tap off excess, and dunk in egg mixture. Allow egg to drip off excess, and dredge in 2nd flour bowl. Don't tap off excess this time, but place directly into hot skillet. Repeat with remaining chicken, but don't overfill the pan.

Allow chicken to cook on each side for about 10 minutes or until golden brown.

Drain on baking racks over paper towels, cover only with a towel to keep crisp.

Country Fried Potatoes

This recipe, ever so simple, has been passed to me by my grandmother, and I include it as my favorite recipe. I'll NEVER make it like she did, but I'm still trying!

Ingredients:
- 4 Medium Sized Russet Potatoes
- 5 tbsp Shortening
- 2 pinches of Salt and pepper
- 1 pinch of garlic powder
- 1 pinch of paprika

Kitchen:
- Large Skillet with a lid (don't use non-stick)
- Large spatula
- Large Mixing bowl with ice water

Directions:
Peel and cut potatoes in half, length-wise. Slice 1/4" slices width-wise and blanch in ice water for 5-10 min.

Heat Shortening in skillet over medium to medium high heat.

Drain potatoes and pat dry with paper towels. Toss with salt, pepper and spices until combined. Put enough potatoes in the skillet to cover the bottom of the pan, no more. Cover for 1 min, turn with spatula. Repeat covering, turning, until the potatoes are golden brown.

Remove from skillet and drain on paper towels. Continue until all of the potatoes are done.

Punk Nut Bread

(AKA: Banana Nut Bread)

Ingredients:
- 5 over ripe bananas
- 1 cup sugar
- 1 cup chopped walnuts or pecans
- 1/2 c. applesauce
- 2 eggs
- 1 tsp. baking soda
- 1 tbsp. baking powder
- 1 pinch salt
- 1 tsp. vanilla extract
- 2 c. flour

Kitchen:
- Large Mixing Bowl
- Potato Masher
- Strong arm or Electric Mixer
- Nonstick Spray
- 1 9"x 5" loaf pan, or 3 2"x 4" aluminum loaf pans

Directions:
Heat oven to 350.

Place bananas in mixing bowl and mash with potato masher. Fold in the sugar and let stand 15 minutes. Add the applesauce, nuts and eggs and beat like a punk. Beat in the baking soda, baking powder, salt and vanilla, then gradually beat in the flour, mixing thoroughly.

Pour into loaf pan(s) that has been coated with nonstick spray.

Bake for 45 minutes for loaf pan (30 min for small pans) or until a toothpick inserted in the center of the loaf comes out clean. Remove from oven and let stand 10 minutes before removing from the pan.

Grit Cakes with Bacon Cream

Grit Cakes

Ingredients:
- 4 1/2 cups instant grits
- 1 tsp garlic powder
- 3 tbsp flour
- 1 tbsp cayenne pepper
- Salt and pepper to taste
- 2+ cups of vegetable oil
- extra flour for dredging

Kitchen:
- Medium sauce pan
- Wooden Spoon
- Large Casserole dish
- Large skillet (or deep fryer)


Directions:
Prepare Grits according to package in medium sauce pan over medium high heat. Cool completely. Mix in garlic powder, cayenne pepper, salt and pepper, and spread into the casserole dish, using the wooden spoon to flatten out and press down. Place in refrigerator for no less than 2 hours, overnight is even better, but about 4 hours is perfect.

Cut grits into brownie sized squares, and dredge in flour.

Over medium high heat, fill skillet to around 1" full of oil. Once oil is hot, Fry each grit cake for about 2 minutes on each side, and drain on paper towels.


Bacon Cream

Ingredients:
- 6-8 slices thick cut bacon
- 2-3 Chopped green onions
- 2 tbsp Old Bay Seasoning
- 1/4 cup flour
- 1 cup milk
- 4-5 pinches of salt
- Pepper to taste

Kitchen:
- Large Cast Iron or Aluminum Skillet
- Wisk
- Large Kitchen Knife Sharpened

Directions:
Put skillet over medium heat.
Cut up bacon into 1" squares, and brown in hot skillet for 3 minutes, continually stirring, until bacon is golden but not crispy. Add green onions and Old Bay, cook for about 1 minute.

Sprinkle flour, a spoonful at a time, wisking it into the grease until it's bubbling and starting to brown. Add the milk slowly, wisking vigorously. (you may not need all the milk, and you may need more) Add salt and pepper, and cook until it thickens.

Serve over grit cakes.

Buttermilk Biscuits and Sausage Bacon Gravy

Biscuits

Ingredients:
- 2 cups flour
- 2 Tbsp. butter
- 2 Tbsp. shortening
- 2 Tbsp. baking powder
- 1/4 tsp baking soda
- 2 pinches of salt
- 1 cup cold buttermilk

Kitchen:
- Large Mixing Bowl
- Large work area
- Wax Paper or Parchment paper
- Flour for dusting
- Drinking glass or large biscuit cutter
- Cookie Sheet
- Rolling Pin (optional)

Directions:
Preheat oven to 450 degrees.

In a large mixing bowl, combine all the dry ingredients. Using your fingertips, rub butter and shortening into dry ingredients until mixture looks like crumbs. (be quick about it, or the fats will melt.) Make a well in the center and pour in the chilled buttermilk. Stir just until the dough comes together. The dough should be sticky with the consistency of super-thick paste.

Lay out Parchment paper onto your working surface and dust with flour. Drop dough onto floured surface, dust top with flour and gently fold dough over on itself 5 or 6 times. If you're using a rolling pin, top dough with another sheet of parchment paper and roll dough into a 1-inch thick round.

Cut out biscuits with floured cutter or drinking glass, being sure to push straight down through the dough, and wiggle a little to loosen them up, but not bunch up the dough. Place biscuits on baking sheet so that they just touch. Reform scrap dough, working it as little as possible and continue cutting.

Bake until biscuits are tall and golden on top, about 16 to 20 minutes.


Sausage and Bacon Gravy

Ingredients:
- 1 lb. mild or hot sausage
- 6 slices thick cut bacon
- 1/4 cup flour
- 1 cup milk
- 1/4 cup heavy cream
- 4-5 pinches of salt
- Pepper to taste

Kitchen:
- Large Cast Iron or Aluminum Skillet
- Wisk
- Large Kitchen Knife Sharpened
-Large mixing bowl

Directions:
Put skillet over medium heat.
Cut up bacon into 1" squares, and brown in hot skillet for 3-4 minutes, continually stirring, until bacon is golden but not crispy. Add sausage, and brown. Once Sausage/Bacon is completely browned, transfer from the skillet to the mixing bowl. Turn heat down to medium low.

There should be about 3-4 tablespoons of grease and little bits of meat remaining in the skillet. Sprinkle flour, a spoonful at a time, wisking it into the grease until it's bubbling and starting to brown. It should thicken but still be liquid. (If you add too much flour, it will clump up and burn. Add some shortening, about a tsp at a time if this happens.) As the flour thickens to the point where it starts to clump a little, turn up the heat and add the heavy cream, wisking quickly as you pour.

Wisk and let the mix start to thicken again, and add the milk slowly, wisking vigorously. (you may not need all the milk, and you may need more) Add salt and pepper. If the gravy doesn't start bubbling within 1 minute, turn up the heat until it does. Let it bubble and thicken, and add the sausage and bacon back into the gravy and incorporate completely. Remove from heat and serve over the buttermilk biscuits.

Monday, June 21, 2010

Hot Water Cornbread

Ingredients:
- 1 cup cornmeal
- 3 pinches of salt
- 1 pinch of sugar
- 2 tbsp. dehydrated onion flakes
- 1 cup boiling water

Kitchen:
Big Cast Iron Skillet
Vegetable Oil or Crisco - about 1/2" in the pan
Metal Spatula
Plate lined with paper towels

Directions:
Heat oil over medium high.

Combine all the dry ingredients. Boil water and combine 1/2 cup quickly. Add a little at a time, until it's the consistency of spackle.

Get a spoonful and flatten into a patty about the size of your palm. Place in oil. Careful! It should really fry up almost violently, so stand back between placing patties in. Each side should fry for about 1-2 minutes.

Drain and place on paper towel lined plate.

Serve with honey or butter.

Thursday, June 17, 2010

Sorta Homemade Chicken and Dumplings

Choosing your chicken:
I buy only the thighs with skin on for more flavor, but have substituted skinless breasts for a healthier alternative. Either way, you want bone-in bird. For a larger feast, double the ingredients, and use a whole chicken, cut into 8 sections.

Serves 4

Ingredients:
- 1 lb. chicken thighs
- 1 Tbsp. Butter
- 1/2 onion, chopped
- 2 cloves garlic, peeled
- 3 Tbsp. Italian Seasoning
- 3 Tbsp. Powdered Chicken Broth Mix
- 4 cups water
- 3 pinches of Kosher Salt and Cracked Pepper

Dumplings:
- 3 cups bisquick
- 1/2 cup milk
- 1/2 cup heavy cream
- Pinch of salt

Kitchen:
- Large Dutch Oven or Heavy Stock Pot with lid
- Mixing Bowl
- Cutting Board
- Clear plastic wrap

Directions:
With the dutch oven, melt the butter on medium heat and sweat the onions completely. Add garlic, italian seasoning and broth mix and saute for one minute.

Add the water, salt & pepper, raise the heat to medium high, and add the chicken. Bring to a boil. Make sure the water just covers the chicken, so add more if you need to. Boil the chicken until the juices run clear.

In a large mixing bowl, combine Bisquick, salt, milk and heavy cream, and stir until a gooey dough forms. Cover with clear plastic wrap and set aside.

Remove chicken from pot and place on cutting board to cool, turn heat to low. Let chicken sit for about 10 minutes, and then seperate the skin, meat and bones, adding the meat back to the pot.

Bring the heat back to medium until it begins to bubble, and gently drop spoonfull sized dumplings to the boiling water. Boil for about 12 minutes.

The dumplings should thicken the stock to a gravy, but if you'd like to thicken it, use 1 tablespoon of corn starch in a small cup of cold water, mix until dissolved, and slowly add to pot, continuously stirring.

Chocolate Salty Balls

Ingredients:
- 1 stick unsalted butter
- 1 heaping tablespoon kosher salt or sea salt
- 1 bag marshmallows
- 6 cups Chocolate Krispy Cereal
- Extra Butter for your hands at Room Temperature
- Spray Oil

Kitchen:
- Large Stock Pot (nonstick makes it easier)
- Medium Casserole, brownie pan, or plastic container
- Large Sturdy Spatula
- Aluminum Foil

Directions:
Grease Casserole dish with the spray oil thoroughly. Roll out Aluminum Foil onto the counter and spray with oil too.

Melt butter over medium heat, stirring often/constantly. Butter will bubble, then foam, then go clear again, so keep stirring. Butter should have a nutty aroma and turn a golden color as it starts to brown.

Keep stirring over medium heat for about 1 minute longer, and dump the bag of marshmallows and salt into the butter, and immediately take the pot off the heat, stirring vigorously to allow the butter to melt the marshmallows. It should take about 5 min for the marshmallows to completely melt, so return the pot to low heat if you need to.

Once the marshmallows are completely melted, pour in 1 cup at a time of the Chocolate Krispy Cereal and stir. This is where you may get a brief upper body workout, the more cereal you add, the more resistance you get when stirring. Push on until the cereal is completely incorporated.

Before you dump it into the aluminum foil, taste a bit to see if you'd like to add another pinch or two of salt. (I usually do.)

Get a pinch or two of softened butter and rub it on your hands like lotion. Pinch some cereal mix off and roll into a ball. The balls should be a little smaller than a golf ball. Place in the casserole dish as you go. You may need more butter for your hands, I usually use about 4 tablespoons.

Wednesday, June 16, 2010

Kerri's Baked Macaroni and Cheese

Ingredients:
- 2/3 16 oz. box of elbow macaroni (any pasta you like will work)
- 1 tbsp. olive oil
- 1 stick salted butter (1/2 cup)
- 2 tsp. ground mustard
- 1/4 cup flour
- 1/4 cup heavy cream
- 1 to 2 cups of milk (whole is great, but I use 2%)
- 4 cups shredded cheese
- 5 pinches of salt
- Additional 2 tbsp. salted butter
- 1 cup Breadcrumbs
- Pepper to taste


Kitchen:
1 Medium sized pot for boiling pasta
1 Large Skillet
1 Wisk
1 Pasta strainer (optional)
1 casserole dish

Instructions:
Heat oven to 400°

Fill Pot halfway with water and bring to high heat. Once water is boiling add 2 pinches of salt and a turn of olive oil. Add macaroni and stir until boiling again.
Set kitchen timer for 8 minutes. Pasta should be slightly underdone, or al dente. The best way to check the pasta is to bite it and chew. It should be firm but not crunchy. Also, if you squeeze it and it bounces back to shape, it's not over cooked. Drain water and wash pasta with cold water. Set aside.

Melt butter in the skillet over medium heat. Once butter is completely melted and bubbling, add mustard and flour. Lower heat to medium low. Stir with wisk until the consistency is almost paste-like and bubbling. (Add in more flour to thicken. I eyeball it.) Slowly wisk in heavy cream and stir until it thickens evenly. It should thicken up to a smooth paste. Stir for about 1 minute, and slowly wisk in the milk. Keep wisking as you add 3/4 of the cheese, (about 3 cups) a handful at a time. Add in Salt and Pepper to taste. Bring the heat back up to medium and wisk until the cheese just begins to melt.

Return the pasta to the pot. Remove cheese mixture from heat and pour over the pasta. Combine the pasta and cheese thoroughly and pour into the casserole dish, spread it out evenly. Sprinkle the remaining shredded cheese over the macaroni.

In the microwave, heat the breadcrumbs and 2 tbsp butter for about 20 seconds. Remove and stir until the butter is completely incorporated. Sprinkle evenly over the dish.

Bake on center rack for 25-35 minutes, depending on how toasted you like the top.

Wednesday, April 28, 2010

Camping: the easy way or the hard way?

Camping isn't fun for everyone, but I love it.

The smell of fresh, clean air. The smoky taste on all the food from the fire. Critters attempting to rummage through your goodies, and doing your best to prevent it from happening again. Sleeping under the millions of stars I can't see from my backyard. Nature. Peace.

Jason and I decided to camp the night before we were actually going to go. In Florida, procrastination is going to run you into trouble in several ways. Packing in a hurry, Traveling, and accomodations all fell prey to our cést la vie attitude. After the night was spent, I vowed never to be so unprepared.

I've put together a sort of check-list, and a ready backpack for my personal wants/needs while camping.

Camp with a backpack!


Fit all of these items in one standard backpack:

- Flashlights - Take at least one for every person in your group. This will greatly increase your odds at getting firewood after dark, and not losing your way to the loo. I packed 4.


- Metal Utensils - You may be tempted to only take some plastic forks, or nothing at all. Having these 3 simple but versatile metal utensils will allow you to cook anything over an open flame. The spoon is pretty self-explanatory, stirring and serving. The fork allows you to flip any sort of meat, and doubles as a marshmallow stick and fire poker. The Spatula has a serrated edge that allows you to not only flip burgers, but cut meat, string, plastic... whatever you need!


- Matches and Waterproof Match Box - Some might say, "I'll just bring a lighter." That's fine if you can guarantee that it won't jam or run out of fuel. The matches are simple and lightweight, and investing in a waterproof match box will ensure your matches stay dry even if you drop your pack in a river, or even in a puddle.


- Water Container - This re-useable water container can be filled, used, drained and collapsed to fit in your pack. This versatile bladder holds 2 gallons, and even can be hung to use as a shower. (Let it sit in the sun all day to avoid a bitter cold shower)


- Firetop Coffee Pot - My name is Kerri, and I'm a coffee-a-holic. I have coffee all day. A coffee pot may not be a necessity for some, but it is quite versatile. (Do you see a trend of versatility?) You obviously can't boil the water while still in the plastic bladder, but having a metal pot for boiling can save you a lot of heartache (and bellyache), especially when there's no clean running water for miles.

Of course, found inside the coffee pot are plastic zipper bags with instant coffee, sugar and powdered creamer. ;) This particular pot is a percolator, but I've taken it out to hold more stuff inside. Also note the handle that allows you to hang it on a hook or a spit over the fire.


- Interlocking Silverware - You may not have these lying around the house, but any store that carries camping supplies will have these, and they're truly worth the few dollars in the long run, mine have lasted 6 years and counting. They are a very simple, knife, fork, spoon set in stainless (so they don't rust) and simple interlocking allows you to pack a little tighter. I have 4 sets.


- Metal Plates - Don't be tempted to pack paper plates! These may weigh a few ounces more, but we're talking about landfills here! These metal plates are coated in ceramic, like the coffee pot, and can nearly double as a soup bowl, the ridge is that deep. And heavy enough to cook with right over the fire. I packed 4.


- Cheap Tablecloth - What? Wait, with all this simple stuff you're suggesting we bring a TABLECLOTH? Surprising, but true. This is probably the MOST versatile item in my backpack. Of course you can use it in the fashion it was intended, but mine can be a stand in for:
-pillow
-blanket
-cover from rain
-carrying medium sized game
-entertainment for kids
-building a small tent
-rescue flag (how far into the wilderness are we going?)

Tuesday, April 20, 2010

Saving up for Vacation


Saving money is hard.

It's partially looking toward the future, holding out on purchasing that new purse, buying generic instead of brand name... and partially having enough to save in this economy.

If you're finally at the point that you can put away a few bucks every month, you're faced with the decision: what to do with it?

I found that with my bank, interest drawn from a savings account doesn't add up to much, but if I add it to my checking account, it'll be used to pay bills or buy groceries. The piggy bank is great for saving, but there's no interest at all.

I went on a search.

I searched for "saving money" in the google bar, and came across thedigeratilife.com - 55 best ways to save money. I clicked and started reading.

Tip #2 - Keep money in a hard-to-access, high interest savings account so that the funds are harder to spend. Use your checking account for your everyday expenses but “hide” the rest of your money elsewhere, where you’re not tempted to use it.

This is exactly what I was looking for. I clicked.

According to thedigeratilife.com, I could put away my money, and have it work for me, without investing in long term stocks and investments. This chart compares online banks, and sorts them by APY Rate. Some have minimum balances, some don't.

Online Bank
APY Rate
Min. Balance
EverBank 2.25% $1,500
Smarty Pig 2.01% $25
Ally Bank 1.29% (Updated 04/06/10) $0
FNBO Direct 1.25% $1
WT Direct 1.16% $1
HSBC Direct 1.10% $1
ING Direct Savings 1.10% $1
ING Direct Checking .25% to 1.25% $1
E-Trade 0.40% $1
Bank of the Internet - $1
Dollar Savings Direct 1.30% $1,000
Citibank e-Savings 1.01% $100
VirtualBank Savings 1.01% $1,000

Of course, I wanted to use Everbank, the highest interest one, but didn't have a whopping $1500 to drop just yet. I clicked on SmartyPig to find out more info.

It took about 5 minutes to set up a new account, the interface was easy to navigate, and I put $100 in, and set up a recurring monthly deposit. SmartyPig even has a savings calculator where you can enter a goal date, how much you want to save, and they suggest a deposit amount to reach that goal in the time frame.

As I was entering my information, a screen popped up. I read that by May, they are RAISING the APY rate if your savings is under $50,000. Wow. That's me!

I'll keep you updated on how it's working for me, but do the research for yourself, you'll be happy you did.

Monday, April 19, 2010

Tuna Tacos - Any day recipe

tuna_tacos
The key to this amazing dinner or lunchtime treat is fresh ingredients.

What you'll need:
- Corn Tortillas (you could substitute flour tortillas)
- Tuna Steak
- Olive oil
- 1/2 Cucumber - finely diced
- Small avocado -finely diced
- 1 plum or roma tomato -finely diced
- 1/2 onion -finely diced
- 1/2 Green pepper -finely diced
- Cilantro (3-4 sprigs if you like cilantro, 5-6 if you love it like we do) finely diced
- 1/2 cup sour cream
Optional:
- Shredded Cabbage
- Coconut milk

tuna_tacos
- Cut tuna steak in big cubes
- In medium sized teflon coated pan, heat olive oil (about 2-3 turns of the pan) over medium heat.
- Wait til oil has fully heated, and sear both sides of tuna about 1-2 min on each side.
- Take off heat and allow the tuna to cool a bit.
- Once cooled, cut into smaller pieces

tuna_tacos
-In a medium mixing bowl, toss remaining ingredients, add salt and pepper to taste.
- Spoon out mixture onto tortilla, add some tuna chunks, and serve!

Thursday, February 11, 2010

New Domestic Goddess Items

There's a brand-spanking new shop that just opened down on the corner of http://www.cafepress.com/DomestikGoddess, and we just couldn't wait to show off some of the great items featured there!

There are plenty of really affordable items, and several different designs to suit your taste.


Domestic Goddess Retro Star Pattern Mug


Domestic Goddess 2010 Calendar Print

Domestic Goddess Colorful Mug set (4)

Our newest design: the skull and crossbones made from
a measuring cup, fork and spoon!


The back of the shirt features a punk typestyle in magenta and black.


And there's so much more! From aprons to bumperstickers, magnets to greeting cards. Stock up on your Domestic Goddess Gear today!

Wednesday, January 27, 2010

I suck at blogging.

For whatever reason, the more domestic goddess-y I've become, the less time I find to blog about it. So I'm gonna try harder.

A week and a half ago, I swore off doing freelance design work for a while. This self proclamation suddenly felt freeing and empowering. I'm now free to do whatever I want in my spare time. I can take care of laundry AND sew a potholder. I can make a purse. I can doodle and paint. I can take cute pictures of what I've accomplished. The sky is the limit, but I find myself lost in the clouds.

Christmas brought forth a never-ending supply of items to make: I knew just what I wanted to do, and how to do it. I organized my sewing room and went forth on my mission. I stitched, and glued, and painted, and pinned, and cut and did it until my fingers were falling off. Enjoying every minute of it. I would get in my car after work, and on the drive home I'd imagine all the things I could accomplish that day, and couldn't wait to get in the zone.

After Christmas passed, the projects were completed and the gifts were distributed. I felt so accomplished. The first year I've actually managed to MAKE the gifts. And then I relaxed into a dark, furry, soft place, and stayed there.

I'm ready for the project mojo to come back. Sure, I made a purse, but it took over 2 weeks to complete. I started a potholder, but currently, it's sitting on my piano bench with more pins than a voodoo doll. I'm customizing a munny for an art show in Feb, but anything that could go wrong, has. I'm not short on creativity, imagination or ideas, I have at least 10 pages in my sketchbook full of future projects waiting to be born.

I just need that mojo back.